Learn about how to use the Adobe Acrobat content and tags panels, issues with auto tag, clearing out pesky errors, and a few tips and tricks.
Download a PDF copy of the Demystifying PDF Accessibility: Clearing those pesky errors + Unfamiliar Tips presentation.
A Little About Me
Instructional Designer
Designs online courses with faculty at The University of Texas at Arlington
Accessibility Advocate
- 7+ years coaching faculty on document and video accessibility
- Authored the white paper, “Student Success and Accessible
Course Content at UTA” to recommend a proactive approach
to accessibility.

Using the Content and Tags Panels
Content & Tags Panels
These are two panels that you will use extensively when checking and ensuring a PDF is accessible.
Let’s compare the two!
Content Panel
- Actual text, images, and links composing the document
- Deleting removes the content completely from the document
- Determines layering order
Tags Panel
- Specifies what kind of content the text, images, and links are
- Deleting keeps the content but deletes the tag
- Determines reading order

Tips & Tricks
Where is that Tag?!
You might need to find a tag to:
- Check or add alternate text of a figure
- Make sure the tag is correct
- Add a link reference to an existing tag
- Continue checking accessibility where you left off
How to Quickly Find a Tag
- Select the text for the tag that you need to find
- You may need to change from the hand icon to the selection tool
- From the Tags panel, click the Options button
- Choose Find Tag from Selection
Pro Tip: Sometimes I need to click “Find Tag from Selection” twice in order for it to pull me directly to the tag.

I see some incorrect tags…
You might need to manually change tags:
- After running the auto-tag feature
- When you find tags that are incorrectly labeled
How to Change a Tag
- From the Tags panel, right click the Tag
- Select Properties
- On the Tag tab, use the Type dropdown to select the correct tag type

Wi-fi is pronounced “why fi” not “wee fee”!
You might need to make corrections to how text is read when:
- The screen reader mispronounces words or abbreviations
- There is space missing between words, causing the words to be read as one word
How to Use the “Actual Text” Field
- From the Tags panel, right click the Tag
- Select Properties
- On the Tag tab, type the text as you want it read in the Actual Text field.

Let me just make my own tag!
You might need to make your own tag when:
- You are manually tagging with the Reading Order and Acrobat stops creating tags
- Figures change in appearance or location when they are tagged
- You need to create List and Table tags as the parent tag for sub-tags
How to Manually Create a Tag
- From the Tags panel, right click the tag that is above where you want the new tag to be
- Select New Tag
- Select the tag type from the Type drop down box.

- Select the text you need to tag
- In the Tags list, right click the tag that was created in Part 1
- Select Create Tag from Selection

Saving Your Work
Save often but save smart!
What does this mean? Some actions you take when making a document accessible cannot be reverted with the Undo option!
For example:
- Tagging an item with Reading Order
- Deleting items from the Content panel
- Making changes using Table Editor
When to Save…

Before tagging a complex figure
- A complex figure is when you select it and there is more than one bounding box. These have a greater chance of changing their appearance once it is tagged.
Before tagging artifacts
Before deleting items from the Content panel
… And When Not to Save!
When working in Table Editor to adjust column and row span settings, before saving, run the Accessibility Checker to make sure this did not cause any “Table Regularity” errors.
Why? Once there are table regularity errors, it is sometimes hard to work in Table Editor.
If there are no table errors, then save your work.

When to Tag Figures & Artifacts
Tag figures after you have tagged all other text items.
Why? Sometimes figures change appearance or location when you tag them. So, save them for the end when you can use “Save often.
Safe smart.” to make sure you can always close without saving if things go wrong with figures.
Tag artifacts after you have tagged all other text items and figures.
Why? Sometimes tagging artifacts will cause Acrobat to stop creating additional tags.
Additional Accessibility Checkers (Free and available for PC)
PAC 3

PAC 3 will check additional items, such as:
- If table header cells are associated with their sub-cells
- If Path content is tagged
- If Link Annotations are in a Link tag
- If Link Annotations have alt text
- If Note tags have a unique ID
- If the PDF/UA Identifier is set
CommonLook PDF Validator

CommonLook will check even more!
- Advertised as the “only PDF checker that tests against Section 508, WCAG 2.0 AA, PDF/UA and HHS standards”
- Full PDF Validator Features (https://commonlook.com/accessibility-software/pdf-validator/)
Issues with Auto-Tag & Tagging
Where did the text go?
If text disappears after using auto-tag, check the Content panel.
Is the text present and correct in the Content panel?
- If yes, manually tag the text.
- If no, edit the PDF and put the correct text. Then try auto-tag again.
Where did this link come from?
Auto-tag tries to be helpful by creating links for URLs, but sometimes it makes links for items that only look like URLs.
If this happens, delete the Annotation from the Content panel.
Why are there incorrect tags?
Auto-tag is just a machine. It decides between paragraphs and headings by the text’s appearance and doesn’t always get it right.
- If there is a small number of errors, it may be quick to fix the incorrect tags
- If there is a large number of errors, it may be quicker to start over and manually tag the document
Why did the image change in appearance?
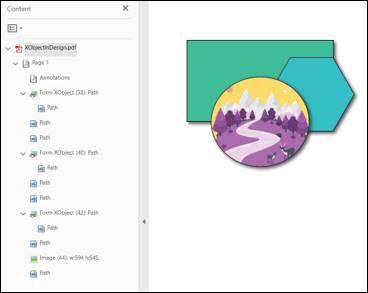
Most likely, the figure was an x-object.

What are XObjects?
- Meant for repetitive objects that only get stored once in a PDF but referenced multiple times.
- Adobe InDesign makes frequent use of this technology in exported PDF files.
- Items on master pages are typically turned into Form XObjects.
How do I fix the image that changed in appearance?
The layering of the individual pieces of the image may have just got rearranged in the Content panel.
Go to the Content panel and check if you can rearrange the individual paths and images items to make it look right again.
If that’s not possible, manually create a Figure tag and associate the content with that figure tag.
The image stayed the same, but it changed its location!
Manually create a figure tag and associate the content with that figure tag.
Clearing Out Pesky Errors
What is Character Encoding?
Character encoding is a set of mappings between the bytes in the computer and the characters in the character set.
Pro Tip: Always check for Character Encoding errors BEFORE you start any PDF remediation.
What Do Character Encoding Errors Look Like?
The screenshot shows:
- The “tt” in “committee” is encoded as a dash “—”
- The “ti” in “participation” is encoded as a period “.”

Clearing Character Encoding Errors: Adobe Recommendations
Adobe Recommends:
- Verify that the necessary fonts are installed on your system.
- Use a different font (preferably OpenType) in the original document, and then re-create the PDF.
- Re-create the PDF file with a newer version of Acrobat Distiller.
- Use the latest Adobe Postscript driver to create the PostScript file, and then re-create the PDF.
Clearing Character Encoding Errors: Editing in Acrobat
If you have the same font installed (or if it is ok to change the font):
- Click the Edit PDF tool
- Delete the incorrect characters
- Re-type the correct characters
- Check the words now display correctly in the Tags and/or Content panel and verify the error is cleared out.
* You may need to re-tag the text if it had previously been tagged.
What are Tagged Annotations?
Annotations are links to either a location in the document or an external website.
When these links are tagged, producing a “Link-OBJR” item, they are called Tagged Annotations.
How to Tag Annotations
- Locate the tag that contains the text for the link.
(See slide: Tips & Tricks > How to Quickly Find a Tag) - Within that tag, create a new Link tag (See slide: Tips & Tricks > How to Manually Create a Tag)
- With the new Link tag selected, click the Options button and select Find
- Change the Find drop down to Unmarked Annotations and select the radio button for Search Page
- Click Find

- When the link is found, click Tag Element
Organize the tag for the proper link structure

Other Elements Alternate Text
Other Elements refers to content, other than figures, that requires alternate text (such as multimedia, annotation, or 3D model)
Though, you may find it most often refers to figures or Xobjects that are:
- Figures that haven’t been tagged – Tag them and add alt text
- Parts/layers of an image that got separated from a tagged figure – Drag the part/layer into the existing tag on the Content panel
What is Table Regularity?
Errors with table regularity mean there are not the same number of columns (TH/TD tags) in each row (TR tag).
This often occurs when there are merged cells and the column or row span settings have not been set correctly.
How to Fix Table Regularity: Simple Tables

If it is a simple table with no merged cells, start with Tags.
Are the tags correct? Are there any extra empty TH or TD tags that should be deleted? If the tags are correct, move to the steps for Complex Tables.
How to Fix Table Regularity: Complex Tables
If it’s a complex table with merged cells, start with Table Editor.

- Open the Reading Order tool
- Right click the Table and select Table Editor
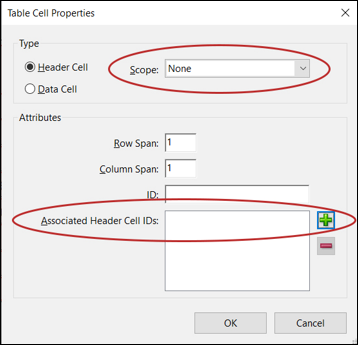
- Right click a cell and select Table Cell Properties
- Pro-Tip: Check cells from right to left
- Verify the Row Span and Column Span are set correctly
- Check the tags to make sure there are no empty/unused TH or TD tags that need to be deleted.
Pro-Tip: Remember the save often, save smart tip! Changing row and column span can “break” the table. Check if what you did cleared the regularity error before saving.
Since we are in Table Editor…
There’s two more tasks you can do:
- Set scope for header rows
- Associate Header Cell IDs

How to Associate Header Cell IDs
Make sure the Header Cells have clear IDs.
- With Table Editor open, right click a header cell and select Table Cell Properties.
- If the ID field is a jumble of letters/numbers instead of a clear location, such as “R4C1”, delete the ID.
- Repeat for all header cells.
- Right click the table and select Auto Generate Header Cell IDs
- Right click a data cell and select Table Cell Properties
- Click the plus button next to the Associated Header Cell IDs and select the appropriate header cell. Repeat if more than one header cell is associated with that data cell
- Repeat for all other data cells.
Pro-Tip: You can click and drag to select multiple cells at once!


